
相比于Tailscale,headscale虽然性能看你稍微差点,但是开源,各种限制比较少。自己用还是比价推荐的。
GitHub:https://github.com/juanfont/headscale
1、服务端安装:
#已ubuntu为例,自己将链接换成最新版的,下载最新deb安装包
wget https://github.com/juanfont/headscale/releases/download/v0.22.0-alpha2/headscale_0.22.0-alpha2_linux_amd64.deb

#安装
dpkg -i headscale_*.deb
安装过程会自动创建用户headscale。
2、服务端配置:
配置文件在:/etc/headscale/config.yaml
nano /etc/headscale/config.yaml

#修改
server_url: http://你的公网ip或者域名:8080

#自定义私有网段
ip_prefixes:
 # - fd7a:115c:a1e0::/48
  - 100.64.0.0/10

#监听地址修改为0.0.0.0,端口开源修改成自己需要的
metrics_listen_addr: 0.0.0.0:9090
listen_addr: 0.0.0.0:8080

#打开随机端口
randomize_client_port: true

#修改一下headscale.sock目录,其他文件都是保存在/var/lib/headscale,默认配置文件这里是保存到/var/run/headscale可能导致无法运行,所以要修改一下
unix_socket: /var/lib/headscale/headscale.sock
3、启动服务端:
#修改一下开机自启文件
vim /etc/systemd/system/headscale.service

#修改成以下内容
[Unit]
After=syslog.target
After=network.target
Description=headscale coordination server for Tailscale
X-Restart-Triggers=/etc/headscale/config.yaml

[Service]
Type=simple
User=root
#Group=headscale
ExecStart=/usr/bin/headscale serve
Restart=always
RestartSec=5

WorkingDirectory=/var/lib/headscale
ReadWritePaths=/var/lib/headscale /var/run

AmbientCapabilities=CAP_NET_BIND_SERVICE CAP_CHOWN
NoNewPrivileges=true
PrivateTmp=true
ProtectHome=yes
ProtectSystem=strict
RuntimeDirectory=headscale

[Install]
WantedBy=multi-user.target


#重启daemon-reload
systemctl daemon-reload

#重启一下headscale
systemctl restart headscale

#设置开机自启
systemctl enable headscale

#查看运行状态
systemctl status headscale
4、客户端安装。基本上所有客户端都能搞。
服务端先创建一个用户:
#需要先创建用户,在服务端运行:
headscale users create zsxwz
#创建一个zsxwz的用户
4.1、比如Windows版本,先安装tailscale客户端[没错就是这个客户端]:https://tailscale.com/download/windows
安装注册表:
浏览器打开:http://你服务器ip:8080/windows
根据提示修改一下注册表,或者直接下载reg文件,运行一下就可以了。
运行tailscale客户端,点击图标,浏览器会自动跳转nodekey获取地址。或者Windows cmd窗口运行:
#第一次登录,注册,Windows客户端打开cmd执行
tailscale login --login-server http://你服务器ip:8080
#打开链接获取服务端验证命令
#比如:
headscale nodes register --user USERNAME --key nodekey:8a5183bd416b2b490328595f908647fbcc0fedca5bc92424d8607ba28c1b3b75

#这边的USERNAME用户名,需要先创建,在服务端运行:
headscale users create zsxwz
#创建一个zsxwz的用户

#然后修改一下验证命令,服务端再执行
headscale nodes register --user 你创建的用户名 --key nodekey:8a5183bd416b2b490328595f908647fbcc0fedca5bc92424d8607ba28c1b3b75

#重新登录,Windows客户端执行
tailscale up --login-server http://你服务器ip:8080 --advertise-exit-node
服务端查看在线设备:
headscale nodes list
4.2、安卓客户端。也一样先安装客户端:https://play.google.com/store/apps/details?id=com.tailscale.ipn
反复点击右上角三个点,就会出现,change server,就可以使用自己的服务器。
填一下你服务器地址:http://你服务器ip:8080
然后使用sign with other登录,后面和电脑端一样,出现服务端验证命令,和上面一样操作一下就可以了。
#然后修改一下验证命令,再执行
headscale nodes register --user 你的创建的用户名 --key nodekey:xxxxxxxxxxxxxxxxxx
4.3、linux客户端,也是一样先安装tailscale,已ubuntu为例
#安装软件源
curl -fsSL https://pkgs.tailscale.com/stable/ubuntu/focal.noarmor.gpg | sudo tee /usr/share/keyrings/tailscale-archive-keyring.gpg >/dev/null
curl -fsSL https://pkgs.tailscale.com/stable/ubuntu/focal.tailscale-keyring.list | sudo tee /etc/apt/sources.list.d/tailscale.list

#安装
apt-get update
apt-get install tailscale

#第一次登录,linux客户端执行,会返回一条带nodekey的链接,记一下nodekey
tailscale login --login-server http://你服务器ip:8080

#然后修改一下验证命令,服务端再执行
headscale nodes register --user 你的创建的用户名 --key nodekey:xxxxxxxxxxxxxxxxxx

#重新登录,Linux客户端执行
tailscale up --login-server http://你服务器ip:8080 --advertise-exit-node
这样这几台设备已经是可以异地组网了,就和局域网内一样互相访问。
5、内网穿透,你的电脑A,headscale服务端B,服务端B安装一个tailheadscale客户端,这样局域网内A和B可以互相访问。如果你想让另外一台电脑C,在不加入这个局域网中,就可以访问电脑A搭建的服务,可以在服务端B,安装nginx,反代一下局域网就可以了。
nginx配置:
比如:穿透电脑A的8000端口。
server {
        listen 8000 default_server;
        server_name web1;

        location / {
            proxy_pass http://电脑A组网后局域网ip:8000;
        }
    }
6、打通局域网,比如家里Windows电脑A,安装了tailscale客户端,外地电脑B,也安装了tailscale客户端,但是家里其他设备比如nas,手机都没有安装tailscale客户端。外地电脑B也可以像家里电脑A一样访问家里局域网内的手机,nas等等设备,就可以用Windows电脑A做路由网关。
就是在外使用任何网络,也可以像在家里一样访问家里局域网内的手机,电脑,nas,路由等等。

只需要修改一下注册登录命令即可,后面服务器验证都是一样的。
家里Windows电脑A:
#如果是第一次登录,注册,192.168.0.0/24改为你局域网ip段
tailscale login --login-server http://服务器ip:8080 --accept-routes=true --accept-dns=false --advertise-routes=192.168.0.0/24

#重新登录,192.168.0.0/24改为你局域网ip段
tailscale up --login-server http://服务器ip:8080 --advertise-exit-node --accept-dns=false --advertise-routes=192.168.0.0/24

如果家里是linux电脑,或者openwrt等软路由:
上面也是一样的,只是多一个端口转发:
echo 'net.ipv4.ip_forward = 1' | tee /etc/sysctl.d/ipforwarding.conf
echo 'net.ipv6.conf.all.forwarding = 1' | tee -a /etc/sysctl.d/ipforwarding.conf
sysctl -p /etc/sysctl.d/ipforwarding.conf
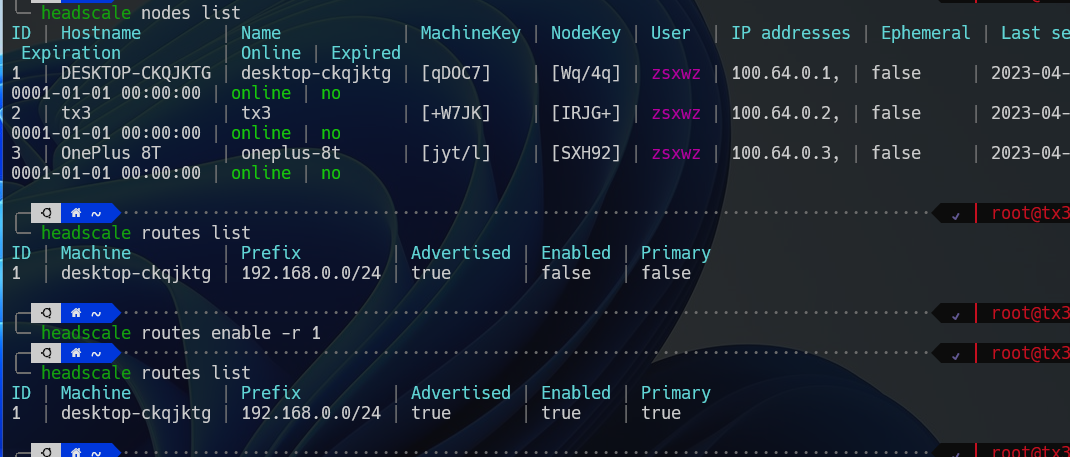
headtail服务端添加一下路由即可:
#查看路由列表,获取需要打通的局域网序号
headscale routes list

#比如打通序号1的路由
headscale routes enable -r 1

非常感谢!