之前发过自建headscale组网服务器:https://zsxwz.com/2023/04/12
使用自己的服务器,可以使用的功能就更多了,比如自建derp中继节点,默认的中继节点都没有国内的,所以速度可能也不是太理想,如果使用国内的服务器考虑备案,如果不使用国内服务器,可以考虑日韩新加坡香港等亚太地区节点,延迟稍微低一点。
首先是有备案域名的情况,先解析你的域名到你服务器ip
1、自建中继需要域名,虽然可能有不用域名的方法,但是自签证书之类的也麻烦。申请证书可以使用acme.sh脚本。
curl https://get.acme.sh | sh
#申请证书,headscale.xxx.com换成你自己的域名,这里申请的是let's的免费证书
bash /root/.acme.sh/acme.sh --issue -d "headscale.xxx.com" --standalone -k ec-256 --server letsencrypt
#安装nginx,后面反代也用得到
apt install nginx
systemctl stop nginx
#下载脚本
curl https://get.acme.sh | sh
#安装依赖
apt install socat
#申请证书,headscale.xxx.com换成你自己的域名,这里申请的是let's的免费证书
bash /root/.acme.sh/acme.sh --issue -d "headscale.xxx.com" --standalone -k ec-256 --server letsencrypt
systemctl restart nginx
#安装nginx,后面反代也用得到
apt install nginx
systemctl stop nginx
#下载脚本
curl https://get.acme.sh | sh
#安装依赖
apt install socat
#申请证书,headscale.xxx.com换成你自己的域名,这里申请的是let's的免费证书
bash /root/.acme.sh/acme.sh --issue -d "headscale.xxx.com" --standalone -k ec-256 --server letsencrypt
systemctl restart nginx
2、derp中继服务,可以使用docker。
#headscale.xxx.com_ecc根据你自己的域名修改
-v /root/.acme.sh/headscale.xxx.com_ecc:/app/certs \
-e DERP_CERT_MODE=letsencrypt \
-e DERP_DOMAIN=headscale.xxx.com \
ghcr.io/yangchuansheng/derper:latest
#headscale.xxx.com_ecc根据你自己的域名修改
docker run -dit \
--restart always \
--name derper \
--hostname derper \
-p 12345:12345 \
-p 3478:3478/udp \
-v /root/.acme.sh/headscale.xxx.com_ecc:/app/certs \
-e DERP_CERT_MODE=letsencrypt \
-e DERP_ADDR=:12345 \
-e DERP_DOMAIN=headscale.xxx.com \
ghcr.io/yangchuansheng/derper:latest
网页监听12345端口,可以根据自己需求修改。headscale默认stun监听3478端口,记得服务器放行12345和3478端口。
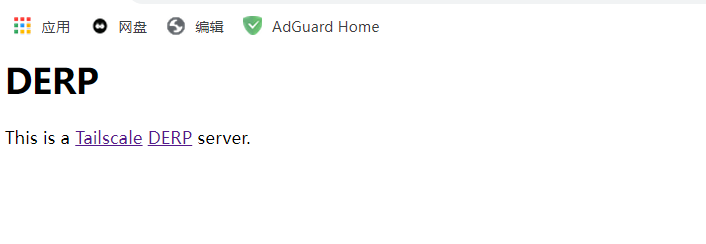
浏览器打开:http://你服务器的ip或者域名:12345,即可查看derp服务是否运行
3、配置nginx反代。
nano /etc/nginx/conf.d/headscale.conf
#headscale.xxx.com根据你自己的情况修改
server_name headscale.xxx.com;
return 301 https://headscale.xxx.com$request_uri;
listen [::]:443 ssl http2;
server_name headscale.xxx.com;
ssl_certificate /root/.acme.sh/headscale.xxx.com_ecc/fullchain.cer;
ssl_certificate_key /root/.acme.sh/headscale.xxx.com_ecc/headscale.xxx.com.key;
ssl_session_cache shared:SSL:10m;
ssl_protocols TLSv1.2 TLSv1.3;
ssl_ciphers ECDHE-ECDSA-AES128-GCM-SHA256:ECDHE-RSA-AES128-GCM-SHA256:ECDHE-ECDSA-AES256-GCM-SHA384:ECDHE-RSA-AES256-GCM-SHA384:ECDHE-ECDSA-CHACHA20-POLY1305:ECDHE-RSA-CHACHA20-POLY1305:DHE-RSA-AES128-GCM-SHA256:DHE-RSA-AES256-GCM-SHA384;
ssl_prefer_server_ciphers on;
add_header Strict-Transport-Security "max-age=31536000; includeSubDomains; preload" always;
add_header Public-Key-Pins 'pin-sha256="amMeV6gb9QNx0Zf7FtJ19Wa/t2B7KpCF/1n2Js3UuSU="; pin-sha256="6YBE8kK4d5J1qu1wEjyoKqzEIvyRY5HyM/NB2wKdcZo="; max-age=2592000; includeSubDomains';
resolver 8.8.8.8 1.1.1.1 valid=60s;
proxy_pass http://127.0.0.1:12345; #端口
proxy_set_header Upgrade $http_upgrade;
proxy_set_header Connection "upgrade";
proxy_set_header Host $host;
proxy_set_header X-Real-IP $remote_addr;
proxy_set_header X-Forwarded-For $proxy_add_x_forwarded_for;
nano /etc/nginx/conf.d/headscale.conf
#添加以下内容
#headscale.xxx.com根据你自己的情况修改
server {
listen 80;
listen [::]:80;
server_name headscale.xxx.com;
return 301 https://headscale.xxx.com$request_uri;
location /nginx_path {
stub_status on;
access_log off;
allow 127.0.0.1;
deny all;
}
}
server {
listen 443 ssl http2;
listen [::]:443 ssl http2;
server_name headscale.xxx.com;
root /root/wwwroot/html;
index index.html;
ssl_certificate /root/.acme.sh/headscale.xxx.com_ecc/fullchain.cer;
ssl_certificate_key /root/.acme.sh/headscale.xxx.com_ecc/headscale.xxx.com.key;
ssl_session_timeout 1d;
ssl_session_cache shared:SSL:10m;
ssl_session_tickets off;
ssl_protocols TLSv1.2 TLSv1.3;
ssl_ciphers ECDHE-ECDSA-AES128-GCM-SHA256:ECDHE-RSA-AES128-GCM-SHA256:ECDHE-ECDSA-AES256-GCM-SHA384:ECDHE-RSA-AES256-GCM-SHA384:ECDHE-ECDSA-CHACHA20-POLY1305:ECDHE-RSA-CHACHA20-POLY1305:DHE-RSA-AES128-GCM-SHA256:DHE-RSA-AES256-GCM-SHA384;
ssl_prefer_server_ciphers on;
add_header Strict-Transport-Security "max-age=31536000; includeSubDomains; preload" always;
add_header Public-Key-Pins 'pin-sha256="amMeV6gb9QNx0Zf7FtJ19Wa/t2B7KpCF/1n2Js3UuSU="; pin-sha256="6YBE8kK4d5J1qu1wEjyoKqzEIvyRY5HyM/NB2wKdcZo="; max-age=2592000; includeSubDomains';
ssl_stapling on;
ssl_stapling_verify on;
resolver 8.8.8.8 1.1.1.1 valid=60s;
resolver_timeout 60s;
location / {
proxy_redirect off;
proxy_pass http://127.0.0.1:12345; #端口
proxy_http_version 1.1;
proxy_set_header Upgrade $http_upgrade;
proxy_set_header Connection "upgrade";
proxy_set_header Host $host;
proxy_set_header X-Real-IP $remote_addr;
proxy_set_header X-Forwarded-For $proxy_add_x_forwarded_for;
}
location /nginx_status {
access_log off;
allow 127.0.0.1;
deny all;
}
}
#重启以下nginx服务
systemctl restart nginx
浏览器打开你的域名:https://headscale.xxx.com,查看是否正常访问。
4、修改headscale使用自己的中继,默认中继节点没有国内的,也是到处乱窜,所以不是很稳定。
headscale搭建看往期教程就好了,就不赘述了。
修改headscale配置,添加derp节点配置:
nano /etc/headscale/derp.yaml
hostname: headscale.xxx.com #换成你自己的
nano /etc/headscale/derp.yaml
#添加以下内容
regions:
900:
regionid: 900
regioncode: xwz
regionname: AWS_TOKYO
nodes:
- name: 900a
regionid: 900
hostname: headscale.xxx.com #换成你自己的
stunport: 3478
stunonly: false
derpport: 443
nano /etc/headscale/derp.yaml
#添加以下内容
regions:
900:
regionid: 900
regioncode: xwz
regionname: AWS_TOKYO
nodes:
- name: 900a
regionid: 900
hostname: headscale.xxx.com #换成你自己的
stunport: 3478
stunonly: false
derpport: 443
DERP 配置文件的详细实例参考:https://github.com/juanfont/headscale/blob/main/derp-example.yaml
修改headcale配置,禁用默认的节点,使用自己的节点配置。
nano /etc/headscale/config.yaml
enabled: false #保持 false,不激活 headscale 自带的 derp。
- /etc/headscale/derp.yaml
# List of externally available DERP maps encoded in JSON
# - https://controlplane.tailscale.com/derpmap/default
auto_update_enabled: true
nano /etc/headscale/config.yaml
#主要修改这几项
derp:
server:
enabled: false #保持 false,不激活 headscale 自带的 derp。
# 配置 DERP 节点项
paths:
- /etc/headscale/derp.yaml
# List of externally available DERP maps encoded in JSON
urls:
# - https://controlplane.tailscale.com/derpmap/default
auto_update_enabled: true
update_frequency: 24h
最后重启一下headscale服务即可。一般来说,一个headscale客户端,和中继derp节点和headscale服务端哪个之间延迟低,就连接哪里。
#查看,是否使用了自建derp节点
tailscale netcheck
#ping测试一下
tailscale ping 组网后局域网ip
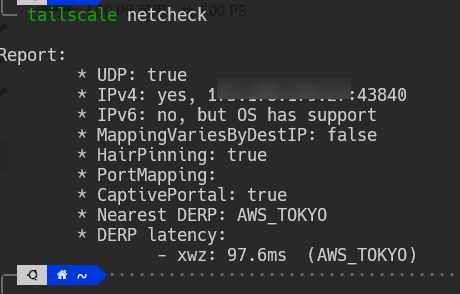
#查看,是否使用了自建derp节点
tailscale netcheck
#ping测试一下
tailscale ping 组网后局域网ip
没有备案域名的情况,由于derp只能使用ssl,因此可以自签ip证书。不过一些小商家可能连443端口,不管有没有域名解析到服务器怕是都要备案,自己测试国内腾讯云可以正常使用443,其他的不清楚,估计大厂都可以。也可以使用其他端口。
5、搭建derp中继,使用的是这位大佬的自签ip证书:https://github.com/yangchuansheng/ip_derper
docker run --restart always \
--name derper -p 12345:12345 -p 3478:3478/udp \
-v /var/run/tailscale/tailscaled.sock:/var/run/tailscale/tailscaled.sock \
-e DERP_HTTP_PORT=12346 \
-e DERP_CERTS=/app/certs \
-e DERP_VERIFY_CLIENTS=false \
-d dockerproxy.com/yangchuansheng/ip_derper:latest
docker run --restart always \
--name derper -p 12345:12345 -p 3478:3478/udp \
-v /var/run/tailscale/tailscaled.sock:/var/run/tailscale/tailscaled.sock \
-e DERP_ADDR=:12345 \
-e DERP_HTTP_PORT=12346 \
-e DERP_CERTS=/app/certs \
-e DERP_VERIFY_CLIENTS=false \
-d dockerproxy.com/yangchuansheng/ip_derper:latest
记得放行12345和3478端口。
浏览器打开,http://你服务器ip:12345,当然自签证书,浏览器打开肯定会显示证书错误的。
6、修改headscale使用自己的中继。
这种情况只能使用json格式的配置文件,需要是可以直链访问的链接,derp.json 放到可以直链访问的服务器上。
先添加一个节点信息。
"RegionName": "Inner Mongolia随意填",
"HostName": "xxx.xxx.xxx.xxx你服务器ip",
"IPv4": "xxx.xxx.xxx.xxx你服务器ip",
nano derp.json
#添加以下内容
{
"Regions": {
"901": {
"RegionID": 901,
"RegionCode": "xwz随意",
"RegionName": "Inner Mongolia随意填",
"Nodes": [
{
"Name": "901a",
"RegionID": 901,
"DERPPort": 12345,
"HostName": "xxx.xxx.xxx.xxx你服务器ip",
"IPv4": "xxx.xxx.xxx.xxx你服务器ip",
"InsecureForTests": true
}
]
}
}
}
nano derp.json
#添加以下内容
{
"Regions": {
"901": {
"RegionID": 901,
"RegionCode": "xwz随意",
"RegionName": "Inner Mongolia随意填",
"Nodes": [
{
"Name": "901a",
"RegionID": 901,
"DERPPort": 12345,
"HostName": "xxx.xxx.xxx.xxx你服务器ip",
"IPv4": "xxx.xxx.xxx.xxx你服务器ip",
"InsecureForTests": true
}
]
}
}
}
修改headscale配置
nano /etc/headscale/config.yaml
enabled: false #保持 false,不激活 headscale 自带的 derp。
# - /etc/headscale/derp.yaml
# List of externally available DERP maps encoded in JSON
- http://xxx.xxx/derp.json #你derp节点配置直链
# - https://controlplane.tailscale.com/derpmap/default
auto_update_enabled: true
nano /etc/headscale/config.yaml
#主要修改这几项
derp:
server:
enabled: false #保持 false,不激活 headscale 自带的 derp。
# 配置 DERP 节点项
#paths:
# - /etc/headscale/derp.yaml
# List of externally available DERP maps encoded in JSON
urls:
- http://xxx.xxx/derp.json #你derp节点配置直链
# - https://controlplane.tailscale.com/derpmap/default
auto_update_enabled: true
update_frequency: 24h
然后重启以下headscale就可以了
7、如果不用headscale,直接使用账号登录官方tailscale,可以添加中继到Access Control,哪个中继快连哪个。
有公网ip或者局域网内走直连,没有则走中继。
网页登录 TailScale 账号,打开 控制台的 Access Control 页面,添加这样一段注释(也就是在原来的 json 里加个 “derpMap” 的 key)
// "OmitDefaultRegions": true,
"RegionName": "这里一般写机房的位置(纯标示用)",
"DERPPort": 12345, //端口根据自己的修改
"IPv4": "如果是域名这行就不要,如果是ip和上面一行一样",
"InsecureForTests": true,
{
// 这里是其他的原有的一些 key
"derpMap": {
// "OmitDefaultRegions": true,
"Regions": {
"900": {
"RegionID": 900,
"RegionCode": "my-derp",
"RegionName": "这里一般写机房的位置(纯标示用)",
"Nodes": [
{
"Name": "自己的derp",
"RegionID": 900,
"DERPPort": 12345, //端口根据自己的修改
"STUNPort": 3478,
"HostName": "你的ip或者域名",
"IPv4": "如果是域名这行就不要,如果是ip和上面一行一样",
"InsecureForTests": true,
},
],
},
},
},
}
{
// 这里是其他的原有的一些 key
"derpMap": {
// "OmitDefaultRegions": true,
"Regions": {
"900": {
"RegionID": 900,
"RegionCode": "my-derp",
"RegionName": "这里一般写机房的位置(纯标示用)",
"Nodes": [
{
"Name": "自己的derp",
"RegionID": 900,
"DERPPort": 12345, //端口根据自己的修改
"STUNPort": 3478,
"HostName": "你的ip或者域名",
"IPv4": "如果是域名这行就不要,如果是ip和上面一行一样",
"InsecureForTests": true,
},
],
},
},
},
}
“这种情况只能使用json格式的配置文件”


这句话太关键了,我在网上找了好久,只有你这篇教程提到了这个关键信息
我之前一直用yaml配置,始终没有成功(日志显示TLS handshake error form ……:write: connection reset by peer,客户端使用tailscale netcheck也不能成功连接服务器),直到看了您的教程,使用了json进行配置,终于成功了
太感谢了,为您点赞
我也在我的教程(https://doublefire.chen.bbb.enterprises/2023/10/05/A-great-intranet-penetration-solution%E2%80%94%E2%80%94Self-hold-Tailscale-HeadScale/)中对您的这篇博文进行了引用。再次感谢,互联网因你而精彩。